Self Host Your Mail Server at Home by using Raspberry PI

Introduction#
I came across a few posts on the subreddit r/selfhosted about running personal mail servers on cloud VPS. That got me thinking why not self-host my own email server at home instead of relying on a cloud provider’s VPS?
This led me to wonder what I’d need to set up a fully functional email server for personal use. Rather than using a traditional server-grade PC. I decided to try it on a Raspberry Pi, which is small size and low power consumption make it an ideal choice for use as a home email server.
To make this work, I needed to secure a domain (for a personalised email address like hi@0xmm.in) and a public static IP. I purchased the domain from Namecheap, all that was left was to obtain one public IP, so I reached out to my local service provider LSP for my region, However, they advised me to contact the actual ISP, a Tier 2 service provider, since all Tier 3 LSPs fall under ISP.
After getting in touch with the ISP, they sent me an IP justication form and asked me to fill out. Once completed, I submitted the form, they sent me an acknowledgement and assigned me one public IP. The public IP will cost me 200 Rs per month, which is cheap and affordable.
My ISP and Home Router Topology: A Visual Overview#
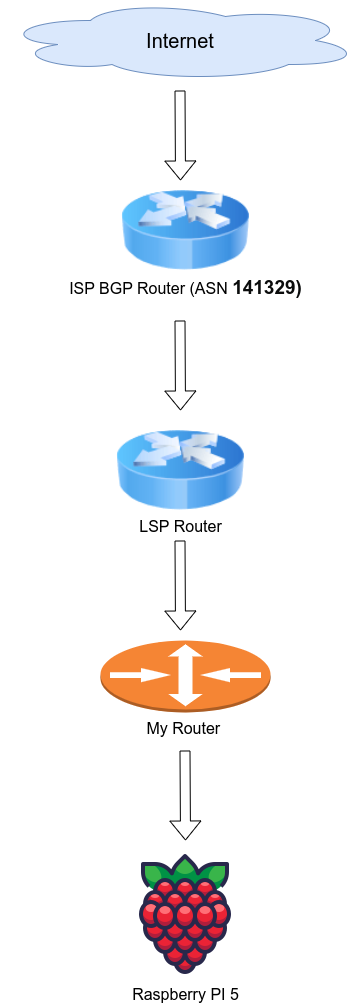
I installed Mailcow Email server in Rapsberry PI using docker, added necessary RR records with dmarc, dkim, and spf (that are today mandatory to be sure that provider like Google or Microsoft will accept my emails) configuration under domain settings, and Portforwarded the necessary ports through the Mikrotik router.
For an email client, I used the open-source K9 Android app, and for a desktop application, we can use Thunderbird or Mailcow Sogo.
Note#
If your mail server configuration is set up correctly, your mail client app will seamlessly fetch all the required settings as soon as you point it to your mail server address. This ensures a hassle-free experience, making it quick and easy to connect and start using your self-hosted email server.
We might ask ourselves, “What are the benefits of hosting an email server at home?” Well, here are a few compelling points that can make it worthwhile:
- Operate 24/7/365 for less than ₹200 Rs per month in electricity costs
- Security
- Nobody can sell your data to advertising agencies
- Ownership
nnumber of custom Email IDs
Apart from that, I also hosted Uptimekuma to monitor the status and uptime of my self-hosted services.
Tip#
https://www.mail-tester.com/ helped me a lot during the setup process to make sure everything was correct.