Raspberry Pi Notifications with ntfy: Build a Home Lab Alert System

Even RaspberryPi Deserve to Be Heard#
After self-hosting a few services and monitoring their state like the Raspberry Pi’s temperature, RAM, and disk usage I wanted a solution that could send me real-time notifications when certain thresholds were reached. I needed something reliable and privacy-focused, without relying on third-party platforms like Telegram bots that handle my data externally. That’s when I discovered ntfy. The best part? It’s completely self-hostable, and integrating it into my existing infrastructure was simple and seamless.
What is ntfy ?#
ntfy (pronounced notify) is an HTTP-based publish/subscribe notification service that lets you send messages to your phone or PC. You can trigger notifications using simple scripts via its REST API or through apps with built-in integrations. The best part? It’s fully open-source, well documented, and completely self hostable meaning you stay in control of your data instead of relying on third party services.
Even better, I can easily integrate it to notify me when a new device connects to my Wi-Fi, or tie it into my existing Grafana/Prometheus containers for real-time alerting.
To get started, you’ll need a few things:
-
A domain with an A record pointing to your public IP address. Example:
ntfy.yourdomain.com→123.123.123.123 -
A web server or router with port forwarding enabled for ports
80(HTTP) and443(HTTPS), so that external clients can reach your ntfy server. -
A host machine to run ntfy on. (In my case, I used a Raspberry Pi, which is perfect for low-power, 24/7 self-hosted services.)
I’ll demonstrate how to run ntfy using Docker, which is the easiest and most portable option. You can also use the direct installation method by downloading the binary from the official ntfy website or GitHub releases, if you prefer a more lightweight setup.
Setting up ntfy’s Configuration#
With Docker now setup we can pivot to getting ntfy up and running. Create the directories to house the docker-compose.yml, cache, user.db, and the server.yml config file.
sudo mkdir -p /opt/docker/ntfy

sudo mkdir /opt/docker/ntfy/cache

sudo mkdir /opt/docker/ntfy/config

sudo chown -R $USER:$USER /opt/docker
You don’t have to follow the exact installation path like /opt/docker/ntfy, you can choose a different path that suits your convenience.
Next create the docker-compose.yml file and edit it.
cd /opt/docker/ntfy
nano docker-compose.yml
version: "3"

services:

 server:

   restart: always

   logging:

     driver: "json-file"

     options:

       max-size: "500k"

       max-file: "1"

   image: binwiederhier/ntfy

   command: serve

   environment:

     - TZ=Asia/Kolkata

   user: "${UID}"

   volumes:

     - /opt/docker/ntfy/cache:/var/cache/ntfy

     - /opt/docker/ntfy/config:/etc/ntfy

   ports:

     - 8002:8002
In this example, I’ll be using port 8002 for HTTP, but you can use port 80 if it’s available. Since I’ve already reserved port 80 for other services, I’m opting for a different one. Also, make sure to adjust the TZ setting to match your local time zone.
cd config/
nano server.yml
default-host: "https://ntfy.yourdomain.com"

base-url: "https://ntfy.yourdomain.com"

listen-http: ":8002"

cache-file: "/var/cache/ntfy/cache.db"

tls-cert-file: "/etc/letsencrypt/live/ntfy.yourdomain.com/fullchain.pem"

tls-key-file: "/etc/letsencrypt/live/ntfy.yourdomain.com/privkey.pem"

behind-proxy: false

attachment-cache-dir: "/var/cache/ntfy/attachments"

keepalive-interval: "45s"

auth-file: "/etc/ntfy/user.db"

auth-default-access: "deny-all"

web-root: "disable"
Save and close the file. Now we need to create a user in ntfy. First start the container
come out from the config folder and hit command docker compose up -d
You can either install a web server like NGINX or Caddy as a reverse proxy with TLS certificates, or you can run the service directly without one. If you choose to use a reverse proxy, make sure to set behind-proxy: true.
If you’re not using a web server to serve ntfy, you can access the web UI directly at the IP address and port of the machine hosting it. Now that ntfy is up and running, we can secure it. First, we need to disable the web app (skip this step if you plan to use the web app), as we won’t be using it. Open the server.yml file and uncomment the web-root line.
Creating a User in ntfy#
Since we’ve already set the auth-file and auth-default-access, we can skip ahead to adding our first user. To do this, we’ll need to access the ntfy container environment and run a few commands. Make sure to replace ntfy-server-1 with the name of your container.
docker exec -it <container name or ID> /bin/sh
ntfy user add yourusername
Once inside the container invoke the ntfy cli and add your first user.
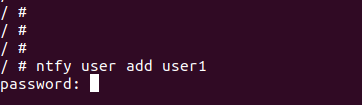
Running this command with a username will automatically prompt you to create a password for the new user. Once the user is created, we can subscribe them to our first notification topic.
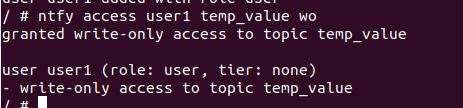
ntfy access nameofuser temp_value wo
The wo specifies the access level of the user for the temp_value topic. Since this user will be used to send notifications, we need to grant them the ability to write to the topic. Therefore, we set the access level to wo = “write-only”. You can also use rw for read-write, ro for read-only, or deny to restrict access. Access permissions can be updated at any time by re-running the command with a different access level.
User Access Tokens#
At this point, the user can post messages to the topic. However, to make things even easier, we will create an access token for the user account. This token can be used in place of the username and password when sending messages. To add the access token, run the following command inside the ntfy Docker container.
ntfy token add user1
When you receive the output, copy the token to your notes as we will need it later. Type exit to leave the container interface.

Systemctl service for monitoring tempreture of RaspberryPi#
systemd service to monitor the Raspberry Pi’s temperature and trigger a mobile notification if it exceeds a defined threshold—using a simple shell script to handle the monitoring.
Create the script file
# Create the script file
sudo touch /opt/docker/ntfy/temp_pi.sh

# Make the script executable
sudo chmod +x /opt/docker/ntfy/temp_pi.sh
sudo nano /opt/docker/ntfy/temp_pi.sh
#!/bin/bash
#user access token and URL to post notification messages
NTFYTOKEN=tk_80g8gomels9qj6h91e9ubjzr5uvsp
NTFYURL=https://ntfy.yourdomain.com/temp_value
#get the temperature
TEMP_RAW=$(cat /sys/class/thermal/thermal_zone0/temp)
TEMP_C=$(echo "scale=1; $TEMP_RAW / 1000" | bc)
#temp threshold
THRESHOLD=47.0
# compare temp
if (( $(echo "$TEMP_C > $THRESHOLD" | bc -l) )); then
curl -H "Title: ${HOSTNAME} -- Temp Alert" \
-u :$NTFYTOKEN \
-H "Priority: 5" \
-H "X-Tags: temperature,alert" \
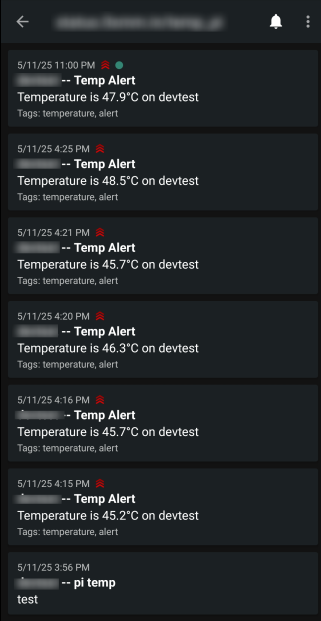
-d "Temperature is ${TEMP_C}°C on ${HOSTNAME}" \
$NTFYURL
fi
Create a Systemd Service#
Create the temp-alert.service file
nano /etc/systemd/system/temp-alert.service
[Unit]
Description=Temperature Alert Service

[Service]
Type=oneshot
ExecStart=/opt/docker/ntfy/temp_pi.sh
Create the temp-alert.timer
nano /etc/systemd/system/temp-alert.timer
[Unit]
Description=Run temperature alert script every 1 minute

[Timer]
OnBootSec=1min
OnUnitActiveSec=1min

[Install]
WantedBy=timers.target
The temp-alert.timer checks the temperature threshold every minute.
Enable and Start the timer#
sudo systemctl daemon-reexec
sudo systemctl daemon-reload
sudo systemctl enable --now temp-alert.timer
Check the status of both services using the following commands:
systemctl status timers.target
and
systemctl status temp-alert.service
Configuring the Android Mobile App#
First download the app from Google Play Store, here (f-droid), and after it installs launch it.
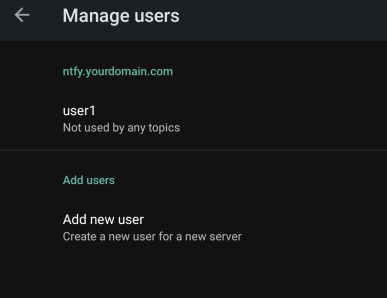
When you launch the app for the first time, you’ll see a blank screen with no topics. To connect it to your self-hosted NTFY instance, open the settings menu (three-dot menu > Settings), then go to Manage Users under the General section. Tap Add new user, and in the Service URL field, enter the URL of your NTFY instance. Use the Username and Password for the user you created earlier. Once all fields are filled, tap ADD USER. Your user should now appear in the list, similar to the image above.
Subscribing to a Topic#
On the app home screen, tap on the green ”+” button and enter the name of the topic you created earlier during the user access step. Then tap “SUBSCRIBE.” If done correctly your new topic should show up on your app’s home screen.
After everything setup correctly you will able to receive notification on your device.