Self Hosting an Authoritative DNS Server for Your Domain
Introduction#
After self hosting a few services at home, I found myself repeatedly logging into my domain registrar’s portal to add or map new IPs and subdomains. This back-and-forth process quickly became tedious. To simplify it, I decided to implement an authoritative name server for my own domain, hosted directly from home. Using an API driven approach, DNS records can now be updated anytime automatically, with Tailscale handling DNS updates for added security.
There are existing Dynamic DNS providers like Oracle’s DynDNS and NoIP that offer similar functionality. These services automatically update DNS records when a client’s public facing IP address changes. Behind the scenes, providers like DynDNS often rely on BIND, a widely used DNS software that powers both authoritative name servers and recursive resolvers.
While BIND is feature rich and heavily adopted, it comes with strict syntax and a more complex configuration. For my use case, I wanted to build a simpler solution something lightweight, easy to configure, and ideal for self hosting at home.
Ultimately, I came across this blog post which provided a simple yet effective code example. It turned out to be an excellent starting point for running my own authoritative DNS server. Under the hood, it uses the miekg/dns library.
Setup#
With just a few small modifications, I was able to adapt the example and get a basic authoritative DNS server running on my localhost. This served as the foundation for further customization and automation.
var domainsToAddresses map[string]string = map[string]string{````
 	"google.com.": "10.2.3.4",
 	"0xmm.in.": "8.8.8.8",
Dig response from localhost#
 root@devtest:~/Desktop/workspace$ dig  @127.0.0.1 google.com

 ; <<>> DiG 9.18.28-0ubuntu0.22.04.1-Ubuntu <<>> @127.0.0.1 google.com
 ; (1 server found)
 ;; global options: +cmd
 ;; Got answer:
 ;; ->>HEADER<<- opcode: QUERY, status: NOERROR, id: 41757
 ;; flags: qr aa rd; QUERY: 1, ANSWER: 1, AUTHORITY: 0, ADDITIONAL: 0
 ;; WARNING: recursion requested but not available

 ;; QUESTION SECTION:
 ;google.com.			IN	A

 ;; ANSWER SECTION:
 google.com.		60	IN	A	10.2.3.4

 ;; Query time: 0 msec
 ;; SERVER: 127.0.0.1#53(127.0.0.1) (UDP)
 ;; WHEN: Sun Sep 28 18:57:12 IST 2025
 ;; MSG SIZE  rcvd: 54
root@devtest:~/Desktop/workspace$ dig  @127.0.0.1 0xmm.in

; <<>> DiG 9.18.28-0ubuntu0.22.04.1-Ubuntu <<>> @127.0.0.1 0xmm.in
; (1 server found)
;; global options: +cmd
;; Got answer:
;; ->>HEADER<<- opcode: QUERY, status: NOERROR, id: 38607
;; flags: qr aa rd; QUERY: 1, ANSWER: 1, AUTHORITY: 0, ADDITIONAL: 0
;; WARNING: recursion requested but not available

;; QUESTION SECTION:
;0xmm.in.			IN	A

;; ANSWER SECTION:
0xmm.in.		60	IN	A	8.8.8.8

;; Query time: 0 msec
;; SERVER: 127.0.0.1#53(127.0.0.1) (UDP)
;; WHEN: Sun Sep 28 18:59:37 IST 2025
;; MSG SIZE  rcvd: 48
If you’re self hosting or running your DNS server inside a VPC with a public IP address, you can test it using the dig command. For example, if your server is hosted at 9.9.6.6, you can query it directly from your PC or laptop by pointing dig to that IP. Don’t forget to open port 53 on your server to allow DNS queries.
dig @9.9.6.6 <yourdomain.com>
Keep in mind that only a few domain registrars allow you to add your own custom nameservers. For example, Gandi and Namecheap provide this option. In contrast, Cloudflare requires a paid plan before you can delegate your domain to custom nameservers.
Even when registrars support custom nameservers, the process may not be straightforward. You’ll often need to configure glue records to properly link your domain with your DNS server. For detailed guidance, refer to RFC 1912, which explains the best practices for setting up glue records and authoritative name servers.
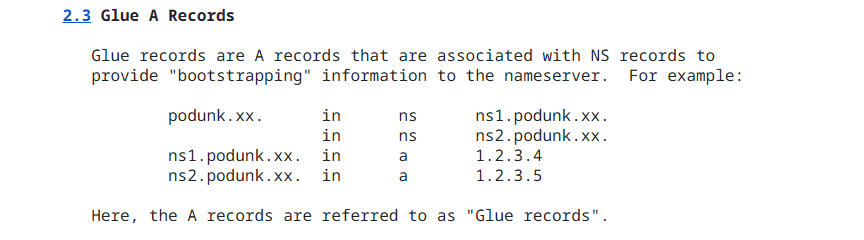
For example, in my case, based on the recommendations from RFC 1912, the configuration for my nameserver configuration looks like this:
  0xmm.in.      in      ns      ns1.0xmm.in.
  ns1.0xmm.in.  in      a       1.2.3.4
Here, ns1.0xmm.in will act as the authoritative nameserver for the domain.
Note: According to RFC 1035, there should be at least two authoritative nameservers for a domain one primary and one secondary. Since this is a side project still under development, I’m starting with a single nameserver and will add redundancy later once the project matures.
If your authoritative DNS server is configured correctly, you can verify DNS propagation using whatsmydns.net. Enter your domain and query for the NS record.
- ✅ Green checkmarks indicate that your nameserver has propagated.
- ❌ Red marks mean some regions are still failing to resolve.
In case of issues, use tcpdump to troubleshoot. You can capture and analyze incoming DNS queries on port 53.
Tools I used during DNS troubleshooting#
- TcpDump
- Dig
- Google’s online tool
- Wireshark
- whatsmydns
- Intodns
In the
digexample above, I wanted to demonstrate that in a DNS entry, you can technically point to any IP address even using a domain name instead of an IP. However, in a production setup, it’s important to correctly map your domain or subdomain using an A record (or other relevant record types).Feel free to experiment with different values during testing it’s a great way to build a deeper understanding of how DNS works.